How to Threat Hunt Your Network

John and I had a huge turnout for our Network Threat Hunting Runbook Webcast. So much so, that I wanted to document some of what we covered so that people have it handy as a reference. In this blog entry, I’ll run through the basic steps to follow when you are executing a network-based threat hunt.
Threat Hunting – The Basics
If you are not familiar with threat hunting, take a quick read through my Tightly Defining Cyber Threat Hunting article. If you are not sure why your threat hunts need to start on the network, check out my post titled Should I Threat Hunt My Systems or The Network?
Five Steps to Threat Hunting Your Network
Network threat hunting can be broken down into five steps, these are:
- Identify persistent communication channels leaving your network.
- Analyze the protocol being used.
- Identify and evaluate the internal host originating the communications.
- Scrutinize the reputation of the destination system.
- Disposition the incident.
The order is important, as its weighted towards reviewing the highest threat evidence first. For example, identifying that data to TCP/443 is simply obfuscated and not actually an SSL or TLS session is far more suspicious that knowing the target IP ended up on a blacklist from an unverified source. So by executing our hunt in the order specified above, we can quickly weed out false positives and focus on the real threats.
Identify Persistent Communication Channels
If an attacker has compromised an internal system, they need to create a communication channel in order to send the system its marching orders. So the first thing we want to look for is whether we have any internal systems that are carrying on persistent communications with one or more systems out on the Internet.
The simplest method of creating this covert communication channel is to have the compromised system call home to a command and control server and keep the connection open continuously. If the connection dies due to a network issue, the connection is immediately reestablished. Tools like RITA and AI-Hunter will show you these long connections, but you can also get this info by viewing the state table in your firewall (if your vendor supports this).
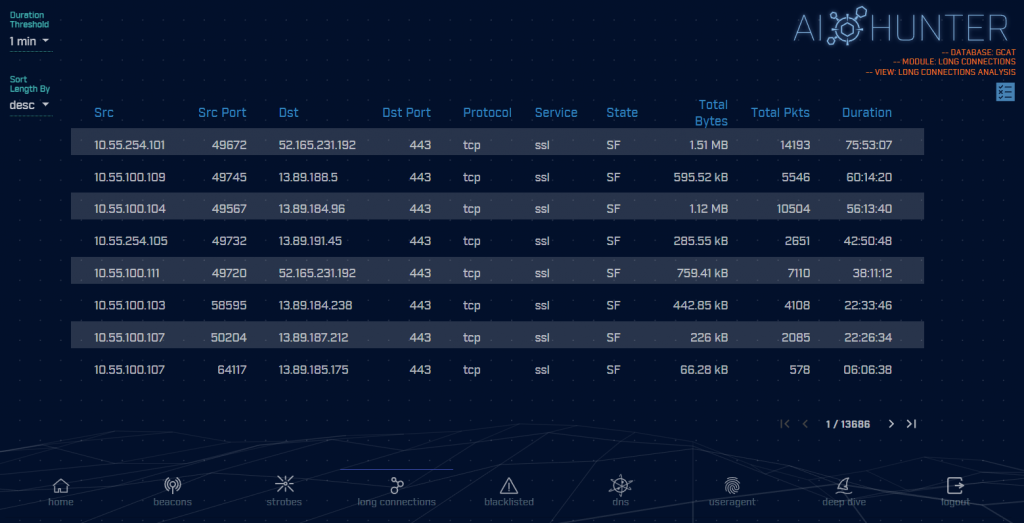
Figure 1: AI-Hunter displaying long communication sessions
The other possibility is that the compromised system beacon home on a consistent basis. These tend to be short sessions, established just long enough for the compromised system to check in to see if the command and control server has anything for it to do. Both RITA and AI-Hunter can be used to simplify the identification of beacons.
Analyze The Protocol
Next, we want to take a look at the protocol being used to communicate between the two systems. For some applications, beaconing is just the way they communicate. For example, any system running Network Time Protocol (NTP) will connect to an NTP server on a very rigid time interval and transmit the same amount of data each time. This can be easily mistaken for a control channel heartbeat until you analyze the protocol.
Some things to look out for:
- Protocols where beaconing is normal (like NTP).
- Traffic on a well-known port that does not match the application that normally uses it.
- HTTP communications that include a user agent field that is unique within your environment.
- HTTPS communications that include a client SSL hello that is unique within your environment.
- Be suspicious of HTTPS communications with a server using a self-signed or free digital certificate.
- Be less suspicious of HTTPS communications with a server using an EV certificate.
- Does the protocol use make logical sense? (example: seeing 1,000+ DNS queries to a specific domain for unique hostnames is more likely to be C&C communications than normal DNS traffic)
Evaluate The Internal Host
Next, we will want to learn as much as we can about the internal system initiating the sessions. What operating system is it using? What is the system’s function (user desktop, network hardware, etc)? Is there a functional baseline to work with to see if this traffic pattern is normal? If we have previous packet captures from the system, or have other similar systems we can compare it against, this might help identify if the pattern we are seeing is normal. As an example, many IoT devices check in regularly with a central console. We may find that all devices exhibiting a specific suspicious behavior are all the same model of IoT device.
You may also want to see if the source is running any kind of endpoint security software or if the logs are being collected to a central location. If we get to the end of our threat hunt and deem the system as suspicious, the additional data provided could be extremely valuable in performing a root cause analysis.
Analyze The Reputation of the Destination System
Finally, we will want to evaluate the destination system our internal host is contacting. Some things to consider:
- Do you recognize the target domain? If it is a vendor or a business partner, the communications may be associated with a service or product you purchased from them.
- Does the geolocation information make sense? As an example, if you don’t have a vendor or a field office in China, but you are sending a lot of data there, it could be a problem.
- How old is the target domain? Attackers are notorious for using domains that are less than seven days old because they can destroy the domain’s reputation and still get a refund from their registrar.
- Is the domain or target system on any blacklists? If so, why, and is it applicable to your situation?
You want to check the integrity of the blacklist entry in order to weed out false positives. For example, it’s not uncommon for Microsoft and Google Web crawlers to end up on blacklists. Sometimes this results in blacklisting full subnets that have nothing to do with the identified activity. Remember that blacklists are usually populated by reports from regular users (crowdsourced). The integrity of the entry is directly related to the security skills of the person reporting the incident. With this in mind, it is always worth validating a blacklist entry.
Disposition The Incident
After performing all of the above steps, we will come up with two possible dispositions:
- The activity is a false positive. Create a whitelist entry so that the activity is ignored in the future.
- The activity is suspicious and warrants further investigation.
Note that in the second option we may or may not be sure that the internal system is actually compromised. It is simply suspicious enough to warrant a deeper investigation. This may include checking system logs or capturing and analyzing all system traffic for a specified period of time. It may also include a full forensic analysis of the system. The suspect activity detected through the above process can be used to help guide the investigation. Your incident handling policy should include steps for handling suspicious systems.
Summary
Because threat hunting is becoming more popular, the need to standardize the process is becoming more important. Consistency matters, as a tribal process is heavily reliant on the training and skills of the people executing the threat hunt to drive its success. By sharing what works and what does not with each other, we can ensure that we can all do a better job at identifying the bad guys when they gain a foothold on our network.

Chris has been a leader in the IT and security industry for over 20 years. He’s a published author of multiple security books and the primary author of the Cloud Security Alliance’s online training material. As a Fellow Instructor, Chris developed and delivered multiple courses for the SANS Institute. As an alumni of Y-Combinator, Chris has assisted multiple startups, helping them to improve their product security through continuous development and identifying their product market fit.