Making a Solar Powered Raspberry Pi
Intro
Running a computer indoors is no big deal – power, wifi, and dry air at a comfortable temperature are all in abundance. Freezing wind, baking sun, and pouring rain are not.
Running a project outdoors is much more fun. We could:
- Have a camera taking pictures of a remote area every few minutes and uploading them
- Run an environmental monitoring station
- Count people or cars passing a certain point
- Track the location of a package or vehicle with GPS, storing the location on MicroSD for later retrieval
In this article, we’ll look at the aspects of running a Raspberry Pi outdoors. At the end you’ll find a shopping list with links and approximate pricing in $US – parts I’m generally confident will work well for a project like this. That said, please feel free to consider other parts and suppliers.
We’ll use an example of a Pi pulling down messages and images over wifi to show on a PiOled or e-paper display mounted on top of the Pi. The concepts we cover here for general setup should apply no matter what kind of data you’re collecting or how you distribute it afterward.
Which Raspberry Pi?
For anyone that dreamed of running a Pi 4B with Gigabit Ethernet, multiple external hard drives, and an HDMI display streaming video from Youtube, you can enjoy the system for about 2 minutes before you drain the battery. 🙂
The power load on the newer boards is substantial; by contrast, the Pi Zero line just sips electricity. I hooked up the Pi Zero with a PiOled display on a moderately beefy battery pack and 24 hours later we hadn’t dropped a single led out of the 4 on the battery charge meter. At the end of this article, I’ll give the math on why this battery pack should be able to run the Pi Zero for almost 10 days by itself.
It’s true that you only get a 1GHz single-core processor and 512MB of ram, but the point of a project like this is running lean – doing the minimum needed to capture information remotely, and doing any beefier processing when the data comes back.
Power Source
First off, we need the ability to power the unit away from 120/240V wall outlets. (If you’re lucky enough to have wall power, grab a US or international micro USB wall outlet adaptor from the shopping list).
We’re going to use a 28W Solar panel pack (4 panels x 7W/panel) that has 2 USB outlets and an ammeter to show how much power it’s supplying. The pack has multiple panes connected by fabric, so you can face the middle two straight south and the panes to its left and right to be a little closer to southeast and southwest (for anyone in the southern hemisphere, sed -e ‘s/south/north/g’). That gives you some power through most of the day without trying to come up with a motorized way to track the sun.
Given clouds and that pesky 16 hour solar drought every day, we’ll need to have the solar pack feed a battery, and have the battery feed the Pi Zero. The size of the battery is up to you, but you might want to think about springing for a relatively beefy one. The 26,800mAh battery I list below is expensive – almost as much as the Solar panel pack – but it means that the unit can continue to run for 9-10 days of rain or overcast skies. The pack has two MicroSD charging inputs, so you could absolutely plug in two solar panel packs to handle an even greater load. Even the 10,000mAh battery should be able to comfortably run this for about 3 days.
On Amazon, there are smaller solar packs that are essentially battery packs with a small panel on the side, and some with up to 4 additional fold-out panels. Pay attention to the total wattage supplied by the entire solar array; one 5 panel model supplied at most 5×1.5W=7.5W. This could take days to charge the battery, and would likely have trouble keeping up in anything but constant cloudless sunlight each day.
Another thing to avoid is trying to daisy chain batteries; there’s a lot of power loss when you use one battery to charge another. It would be better to get a single 20,000mAh battery than have 2 10,000mAh batteries with one charging the other.
One side note; once you have all the components assembled, you’ll want to test what happens after the battery is totally drained and the power comes back up. Make sure the battery you’re using starts to provide power again immediately with no need to unplug a USB cable and replug it back in.
Power Management
To have the Pi Zero run on terribly small amounts of power, we need to shut off everything we can:
- HDMI output
- USB
- Activity light
The script we provide inserts commands into /etc/rc.local to shut these down.
Also, the wifi interface has power management enabled by default, so we shouldn’t have to touch this.
Display
The two supported displays (the PiOled and the Waveshare e-paper 2.7″) are both low power draws. The e-paper series, in particular, uses no power unless you’re updating the screen, so if you’re only sending a new image once an hour the power draw will be almost 0.
If you choose to go with a different display for a different application, pick up one of the USB digital testers below so you can measure the power draw.
Applications
Shut off everything you don’t absolutely need.
If you need to transfer data over wifi, you might consider waking up the wifi interface, waiting one minute to make sure you have an IP address, doing your transfer, and powering the wifi back down before you sleep (for as long as is practical).
Operating Temperature
This one’s hard to pin down. The Pi Zero CPU can run from -40C to +85C, while the wifi chip is supposed to be within 0C to 70C. There’s no strict limit specified for the entire board, so if you’re within 0C-70C you should be fine, and it’s quite possible you can go outside of those ranges. No guarantees.
Networking Options
In this article, we’re using wifi on the assumption that we need Internet access, though not all projects do. We could absolutely have a system with no network access that simply stores images or measurements to the MicroSD card. Once every few months someone comes by, shuts the unit off, swaps out the card with data for a new one, and starts it back up again.
If wifi is not available but you do need some kind of network access, you can choose between using a cellular modem or LoraWAN. Joff Thyer covers how to run a cellular modem as part of a larger article Here
There are also multiple articles on setting up Lorawan Here
Case
For anything exposed, you really want a weatherproof container of some kind. The Amazon search I recommend in the Shopping list below (“weatherproof enclosure clear”) assumes you have a live display that will need to be read without opening the case.
Unlike the solar panels, you’ll probably want the clear top of the case facing away from the sun so the electronics inside aren’t baked on a hot day.
Result
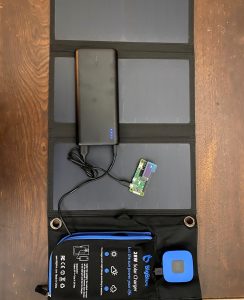
Here’s a picture of the Big Blue Solar pack with the 26,800mAh battery Pi Zero, and PiOled display. The blue-ringed Ammeter is blank because it’s not in sunlight.
The parts below – everything you need except a case – come to about $150 per installation.
Shopping List
These are recommendations – feel free to adjust as needed. None of the links are affiliate links. Approx $US cost.
Raspberry pi zero WH (Wireless, with Headers, you must have the headers to use either display): $14
Display:
PiOled: $15
or
Waveshare 2.7″ e-Paper Hat (black and white, NOT the model B 3 color): $20
MicroSD Card:
8GB (adafruit): $10
16GB (adafruit): $20
In other Raspberry Pi projects, it’s often helpful to buy MicroSD cards with NOOBS preloaded. In this case, it doesn’t matter – an empty Microsd is fine as we’ll be totally overwriting whatever is there.
As always, be cautious of buying any flash storage on Amazon whose prices are too good to be true as cards can be reprogrammed to lie about their capacity. I’ve had good luck with the SanDisk cards purchased from SanDisk on Amazon.
To Go Solar:
Solar panel (Big Blue, 28W): $80 ( $60 w/ current discount)
USB battery pack 10,000mAh or 26,800mAh: $27 or $60
You’ll also need a USB-A to micro-USB cable if your battery pack doesn’t include one. This should be reasonably long so you can mount the solar panel pack and the weatherproof case away from each other.
To Run Off Wall Power:
or
International: $10-13 (90-264V AC, 47-63Hz, UK, Euro, AUS, and US plugs)
Communication:
Not covered in detail, but if you need longer range communication than Wifi, here are some articles:
https://www.adafruit.com/?q=lorawan
https://www.adafruit.com/?q=cellular
Case:
You’ll probably want a weatherproof case to contain everything but the solar panels.
This LeMotech case ($22) looks like a good fit (weatherproof, 9″ long to accommodate larger battery pack, clear cover). I’ve not tried it out, though others have reported success using them with the Pis.
No matter which case you get you’ll also need to drill a hole in the side for the power cable coming from the solar panel to the battery, and buy at least one cable gland (best to get a multipack so you can try different sizes) to seal around the cable: See Here
Misc:
If you don’t already have a way to mount the MicroSD card in your laptop, pick up one USB-MicroSD adaptor (which can be used for each kit you make, you only need one).
If you want to see how much power draw you have in different scenarios, try this USB A and C digital tester: $25
If you only need to measure voltage and amperage at USB-A connectors (should be fine for measuring charge coming from the solar panels and power draw for the Pi under various loads), these should also work…
adafruit: $20
No Need to Get:
- Keyboard
- Mouse
- Monitor
- Micro-HDMI adaptor
- Micro-USB adaptor
References
Configuration Scripts
We provide a package that includes a README on how to load Raspbian on to the MicroSD card, as well as a script that makes all the needed changes to the system to turn it into a remote display for files and images you store on a server somewhere. These can be found Here.
Power Comparison of Raspberry Pi Models
RasPi.TV measures the power needs of different Pi models. In our example of the Raspberry Pi Zero W in a mostly idle setup, we could start with their measurement of 120mA load *. A 26,800mAh battery could run this with no solar input for 26800mAh/120mA ~= 238 hours ~= 9.9 days. A 10,000mAh battery could run this for 10000mAh/120mA ~= 83 hours ~= 3.5 days.
Now let’s see how much solar power is needed to keep ahead of the power draw. We need 0.120A x 5V = 0.6W to run the Pi Zero, so we’d need 0.6W of solar panel output if we had 24 hours of clear sunlight. If we assume we only get 4 hours of strong sunlight, the panels need to put out 6 times that much power to the battery during the 4 hours to cover the rest of a calendar day; 6 x 0.6W = 3.6W. The BigBlue panel above has a theoretical maximum of 28W, so even if we get ¼ of that (7W) we’re still above the 3.6W budget needed to keep ahead of the power draw.
In any scenario where you find over the long term that you’re simply not getting enough power from the solar panel pack, remember that you can buy two of them and plug them into the two inputs on the 26,800mAh battery pack.
* My example system seems to float between 90mA and 120mA with the PiOled showing text, and with HDMI, USB, and activity lights disabled. After halting the Pi Zero the PiOled stays on with a load of 30mA, so that appears to be the PiOled contribution to the load, with the PiZero itself using 60mA-90mA.

Bill has authored numerous articles and tools for client use. He also serves as a content author and faculty member at the SANS Institute, teaching the Linux System Administration, Perimeter Protection, Securing Linux and Unix, and Intrusion Detection tracks. Bill’s background is in network and operating system security; he was the chief architect of one commercial and two open source firewalls and is an active contributor to multiple projects in the Linux development effort. Bill’s articles and tools can be found in online journals and at http://www.stearns.org.