Filtering Out High Volume Traffic

One of the most common problems in capturing and analyzing packets is making sure that the capture system can keep up with the flood of traffic. It’s easy to have a system where the network interface, processor, or disk can limit how many packets can be processed in a second, leading to packet capture loss.
We’ve talked about the general process of speeding that up (see “Improving Packet Capture Performance“). In that blog I mentioned discarding high volume flows as a way to avoid those problems, but never explained how to find them. Let’s cover that now.
Using BPF to Discard High Volume Traffic
The goal is to find one or more traffic types that 1) have lots of packets and/or lots of combined bytes in those packets, 2) are limited to a small number of ports and IP addresses, and 3) are trusted; very unlikely to have anything malicious inside. Once we’ve found these, we put together a BPF (a “Berkeley Packet Filter”); an expression that specifically describes this traffic so that we can tell the capture library to discard it. This may end up discarding between approximately 10% and 80% of the raw packets, leaving our capture and analysis tools able to keep up with the remaining 90% to 20% of the incoming stream.
Here’s an example of a BPF. If I have two mysql database servers, a primary (7.8.9.10) and a secondary (14.15.16.17) and have a lot of replication traffic going from the primary to the secondary, I can use this BPF to describe this traffic:
'(host 7.8.9.10 and host 14.15.16.17 and tcp port 3306)'
I can use that BPF in almost any application that captures packets to only show me this replication traffic, like:
tcpdump -i eth0 -qtnp '(host 7.8.9.10 and host 14.15.16.17 and tcp port 3306)'
, which will just show me that replication traffic. If I want to see everything except that replication traffic, I invert it with “not” (a “discard” filter):
tcpdump -i eth0 -qtnp 'not (host 7.8.9.10 and host 14.15.16.17 and tcp port 3306)'
This is exactly what we’re aiming to do; identify high volume traffic that we no longer want to capture and analyze, discard it, helping our capture and analysis tool to keep up.
Finding the High Volume Traffic
Locating these flows isn’t too difficult if you have the right tool. I’m going to recommend our pcap_stats ( https://github.com/activecm/pcap-stats/ ). This open source tool reads packets from a network interface or pcap file and reports back on both the number of packets and the total number of bytes they contain. Here’s an example of pcap_stats reading packets from a pcap file:
pcap_stats.py -r sensor1.pcap -m 100
This will report on any traffic types that show up in at least 100 packets. Use
pcap_stats.py -h
to see all the available options.
During this process we’ll be re-analyzing the packets multiple times, so it’s a good idea to work from a pcap file instead of directly from an interface.
Here are some sample output lines:
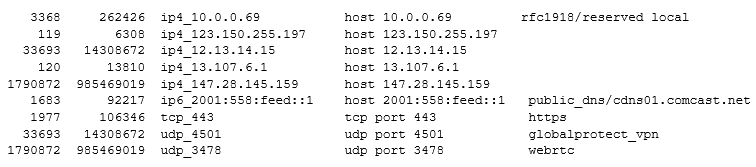
The columns are: 1) Number of packets of this type, 2) Total number of bytes in these packets, 3) description, 4) filter to use for this specific traffic, and 5) hint about what this traffic might be.
Right away we see high volume traffic: both “udp port 3478” and “host 147.28.145.159” have 1,790,872 packets and 985MB of traffic.
Filtering Process and Common Types to Discard
High Volume Port
Let’s start with port 3478:
![]()
The hint for this says it may be WebRTC; streaming audio and video. We were taking part in a streaming webcast, so this seems likely. Since IP address 147.28.145.159 (“washington-353.restream.io”) has exactly the same number of packets and bytes we might guess that that’s the target IP for all this streaming traffic, but instead of guessing, let’s follow the process.
We’ll re-analyze the pcap file, but this time restrict our view to just port 3478 using the “-b” parameter to use a BPF. The filter we’ll use comes from column 4 (bolded above):
pcap_stats.py -r sensor1.pcap -m 100 -b 'udp port 3478'
The output from this includes these same lines:
![]()
, confirming that 147.28.145.159 is our streaming video server. That means
'(udp port 3478 and host 147.28.145.159)'
matches just this traffic. Since we want to discard this high volume traffic to focus on everything else, we’ll instead use:
'not (udp port 3478 and host 147.28.145.159)'
High Volume Port With Multiple IPs
If you have multiple IP addresses talking on the original port, you just need to adjust the filter a little bit. If pcap_stats reported that a second host (“147.28.145.157”) was also streaming over port 3478, we’d still use “host 147.28.145.159” and “host 147.28.145.157”, but we’ll group them with parentheses like this:
'not (udp port 3478 and (host 147.28.145.159 or host 147.28.145.157))'
You can add as many hosts inside the parentheses as you’d like, separated with or’s.
High Volume Host
What’s next? The next highest packet count comes from host 12.13.14.15, so let’s investigate that. Again, look at just traffic to and from this host with a BPF and get the filter from column 4 of the output:
pcap_stats.py -r sensor1.pcap -m 100 -b 'host 12.13.14.15'
Our output includes the following lines:
![]()
, confirming that this appears to be vpn traffic to that IP address over UDP port 4501. (On this sample network, we can confirm that there is a globalprotect VPN client).
Like before, we want to write filters that are limited to a host and port at minimum, so here’s the BPF for that traffic:
'(host 12.13.14.15 and udp port 4501)'
When it comes time to discard this high volume traffic, we’ll use:
'not (host 12.13.14.15 and udp port 4501)'
Merging Multiple Traffic Types
To discard both of these traffic types, we’ll need to use this pattern:
'not ( (heavy_traffic1) or (heavy_traffic2) or (heavy_traffic3)... )'
We surround each individual traffic type with parentheses, separate them with “or”, and put one final ‘not ( )’ around the entire thing.
To merge our 2 current filters, we’ll use:
'not ( (udp port 3478 and host 147.28.145.159) or (host 12.13.14.15 and udp port 4501) )'
Dropping Internal to Internal Traffic
If you’re only interested in traffic that originates from or goes to the Internet (such as when you’re Threat Hunting), it’s hard to write a filter for that since we’d have to come up with every Internet subnet. Instead, let’s write a filter to discard all traffic coming from and going to an internal subnet.
First, find your address space by running
route -n
or
ip route
at a Linux command prompt (or see network settings on a Mac or Windows system.) On this test network, I’m using the /24 (256 addresses) from 10.0.0.0 to 10.0.0.255, written “10.0.0.0/24” (note that the usual filter for 10.0.0.0 is “/8” to cover the entire 10.x.y.z space.)
The simplest way to remove internal<->internal traffic on this network is:
'not ((src net 10.0.0.0/24) and (dst net 10.0.0.0/24))'
This time we’re using “src net” and “dst net” because we have to make sure we’re filtering on both the source and destination IP addresses. If we didn’t use that there’s a chance both expressions would return true because one of the addresses was in 10.0.0.0/24 but not the other.
What happens if you’re using multiple reserved (aka RFC1918) subnets? We can put all of them in this expression at once. The general form is this:
'not ( (all_internal_as_source) and (all_internal_as_destination) )'
Here’s an example that covers all of the reserved subnets:
'not ( (src net 10.0.0.0/8 or src net 172.16.0.0/12 or src net 192.168.0.0/16 or src net 169.254.0.0/16 or src net fe80::/16) and (dst net 10.0.0.0/8 or dst net 172.16.0.0/12 or dst net 192.168.0.0/16 or dst net 169.254.0.0/16 or dst net fe80::/16) )'
This is handy if you’re setting up a filter in advance or aren’t sure what subnets may be in use, as internal systems most commonly use these reserved subnets.
If you know you have some legal address space used by your internal systems, you can add these in too. Here we add 12.13.14.0/24 as an example of a legal address subnet:
'not ( (src net 10.0.0.0/8 or src net 172.16.0.0/12 or src net 192.168.0.0/16 or src net 169.254.0.0/16 or src net fe80::/16 or src net 12.13.14.0/24) and (dst net 10.0.0.0/8 or dst net 172.16.0.0/12 or dst net 192.168.0.0/16 or dst net 169.254.0.0/16 or dst net fe80::/16 or dst net 12.13.14.0/24) )'
Remember, the above filter does a marvelous job of discarding internal->internal traffic, but that’s only if you have no interest in that!
Overriding the Filter
No matter which filter(s) you pick, you may have exceptions; traffic you want to see even if it would normally be discarded. As an example, I might use the ‘not (internal src) and (internal dst))’ approach above, but want to see all DNS traffic, including DNS traffic from my internal machines to my internal DNS server.
The way to handle that is to put in an exception. If we start with my original filter:
'not ((src net 10.0.0.0/24) and (dst net 10.0.0.0/24))'
and want to make sure all dns traffic is analyzed – even from an internal machine to an internal DNS server – I can change it to:
'port 53 or not ((src net 10.0.0.0/24) and (dst net 10.0.0.0/24))'
With that change I’ll still discard almost all internal->internal traffic, except for any DNS traffic that will make it up to my packet capture tool.
Dropping Payload Packets
On most networks, around 90% of the traffic will be TCP. TCP connections are mostly built up from just a couple of SYN, SYN/ACK, FIN, FIN/ACK, and occasionally RST or RST/ACK packets surrounding a long stream of payload packets that have SYN, FIN, and RST turned off and ACK turned on. These “ACK-only” packets make up the vast majority of the TCP traffic, and include all the interesting stuff like:
- HTTP requests and replies
- Server banners with details about software versions and operating system
- Usernames and passwords in plaintext connections
- TLS versions, certificate details, and TLS negotiations in encrypted connections
- User Agent strings
- And everything else found in the conversation between client and server
If you are not allowed to capture this traffic by policy, or simply can’t keep up with all this traffic, it’s possible to discard all the TCP payloads. That might seem a little extreme – you’re losing all the interesting “meat” of the conversation – but there are some plusses:
- You discard 80-95% of the packets right off the bat, dramatically reducing packet loss, CPU load, disk bandwidth, storage needs, and processing time
- You no longer have access to the sensitive parts of the conversations, which is a benefit for privacy and compliance in some environments
- You can still identify that TCP conversations took place at all, when they started, and how long they lasted
- You still have access to all non-tcp traffic
To discard ACK-only TCP packets:
'not (tcp[13] & 0x17 = 0x10)'
“tcp[13]” is the flag byte of the TCP header. By “and”-ing it with hex 17, we extract just the ACK, RST, SYN, and FIN bits since those are the only ones we care about. If that value is equal to hex 10, that means ACK is turned on and the others are turned off, so we discard those.
One advantage of this specific filter is that you’ll still see packets with weird flag combinations (like “no flags at all”, “all flags turned on”, “SYN and FIN in the same packet”, etc.)
Other Types of Traffic to Consider
As you look through the list of traffic types, you might consider:
- Backup traffic carried over a known port to a small number of servers
- Database replication traveling between a primary and one or more secondary database servers
- VPN links
- File server traffic
- Other bulk file transfers or replication links
Always ask: if I filter this out, is there any chance I might hide anything malicious?
Using the Final Filter With Different Tools
For these examples, we’ll use one of the filters we constructed above for the Globalprotect VPN:
'not (host 12.13.14.15 and udp port 4501)'
Please substitute the filter you’ve chosen for this.
tcpdump
The final object on a tcpdump command line is the BPF to use in filtering packets. You should always surround the filter with single quotes as it may contain characters that will confuse the shell:
tcpdump -r packets.pcap -qtnp 'not (host 12.13.14.15 and udp port 4501)'
Testing the Filter With tcpdump
We can use tcpdump to make sure that the filter we chose is working correctly. First, we can ask for only the high volume packets by running:
tcpdump -r pkts.pcap -qtnp '(host 12.13.14.15 and udp port 4501)' | less
The lines of output should only show the high volume traffic we don’t want to see. (Press “q” when you’re satisfied with the results).
Next we can ask for everything except the high volume traffic with:
tcpdump -r pkts.pcap -qtnp 'not (host 12.13.14.15 and udp port 4501)' | less
This display should have none of the high volume traffic.
Paring Down pcap Files With tcpdump
If you store pcap files from your network, perhaps for compliance or forensics, you can optionally reduce their size by stripping out the high volume traffic. Before continuing, please check your retention policy to see if this is allowed.
We’ll read from an existing file on disk (“pkts.pcap”) and write out everything but the high volume traffic to a second file (“pkts-stripped.pcap”):
tcpdump -r pkts.pcap -w pkts-stripped.pcap 'not (host 12.13.14.15 and udp port 4501)'
This may take a while as it has to read the entire source file and write out everything (except for the high volume traffic) to the destination file. If you’re happy with the results, you can delete the source file and replace it with the destination file.
WinDump
WinDump, the windows port of tcpdump, is almost identical to tcpdump in how it works. The one minor consideration is that the Windows command line prefers double quotes to single quotes:
windump -r pkts.pcap -qtnp "not (host 12.13.14.15 and udp port 4501)"
pcap_stats
As we’ve seen, you can apply a filter when running pcap_stats by using the “-b” command line parameter:
pcap_stats.py -r pkts.pcap -b 'not (host 12.13.14.15 and udp port 4501)'
Wireshark
You can apply a BPF during the Wireshark initial packet capture only. Wireshark uses a different language for changing what is displayed, called “display filters”.
Zeek and Bro
Zeek (formerly called Bro) allows you to set a filter that discards unwanted packets right at the point of capture, reducing the number of packets and bytes that need to be analyzed. For more details on how to set this up, scroll down to “Building a Discard Filter” in https://www.activecountermeasures.com/improving-packet-capture-performance-1-of-3/
Other Tools
Almost all packet capture tools support setting a filter; it’s a standard part of the packet capture library they all share. Also, this filter can be set whether you’re reading packets directly from a network interface or reading previously saved packets from a pcap file. Check the documentation for how to set a BPF.
Closing Questions
Doesn’t All This Filtering Take Up a Lot Of CPU?
The filtering is surprisingly quick; the kernel and libraries use an optimized form to quickly decide whether to discard a packet or send it up to the capture program. This is a miniscule amount of processing compared to the processing power, memory, and disk bandwidth needed by the capture program and analysis tools if these packets hadn’t been discarded.
What Are the Steps for Doing This on My Own Network?
- Capture packets from a mirror port to a pcap file
- Run pcap_stats on that pcap file, saving the output to pcap_stats.txt with:
pcap_stats.py -r pkts.pcap >pcap_stats.txt
- To identify the traffic types with the most packets:
cat pcap_stats.txt | sort -nr | less
- Alternatively, to identify the traffic types with the most bytes:
cat pcap_stats.txt | sort -k 2 -nr | less
- Look for high numbered lines in the output, preferably TCP or UDP ports, then IP addresses. It’s best to focus on server IP addresses instead of client IP addresses for that protocol. Make sure this is a protocol you will not want to inspect in the future.
- Rerun pcap_stats with that BPF and try to identify hosts or ports respectively to narrow it down:
pcap_stats.py -r pkts.pcap -b 'not (tcp port NNNN)'| less
- Confirm with both the port and host filters:
pcap_stats.py -r pkts.pcap -b 'not (tcp port NNNN and host a.b.c.d)'| less
- If all looks good, add this to your master filter.
- Repeat a few times, but only focus on high volume traffic. Don’t feel you need to go beyond 3-7 entries.
References
A three part blog series on speeding up packet capture:
https://www.activecountermeasures.com/improving-packet-capture-performance-1-of-3/
An article on how to filter out false positives, covering BPF as well:
https://www.activecountermeasures.com/threat-hunting-false-positives/
The pcap-stats software site:
https://github.com/activecm/pcap-stats

Bill has authored numerous articles and tools for client use. He also serves as a content author and faculty member at the SANS Institute, teaching the Linux System Administration, Perimeter Protection, Securing Linux and Unix, and Intrusion Detection tracks. Bill’s background is in network and operating system security; he was the chief architect of one commercial and two open source firewalls and is an active contributor to multiple projects in the Linux development effort. Bill’s articles and tools can be found in online journals and at http://www.stearns.org.