Getting Started on Contributing to RITA

Intro
Back in 2017, Active Countermeasures and Black Hills Information Security released RITA, an open-source project that seeks out malicious payload beaconing and scanning behavior through ingesting and analyzing Zeek logs. Since then, we’ve had a great number of users cloning our project on GitHub for their own installs. We’ve also had quite a few requests for customizing input and/or output. Adding your own customizations and contributing to RITA is not as daunting as it seems. Many have shared the feeling that they’d need to sit down and learn Go before being able to add their own feature. This blog post is here to assure you that learning Go is not a requirement. So, come bring your tinkering hats and let’s get started on contributing to RITA!
Code Structure
RITA is written in Golang (Go), a compiled language written by Google that has good support for concurrency, which is useful for importing and analyzing datasets with RITA.
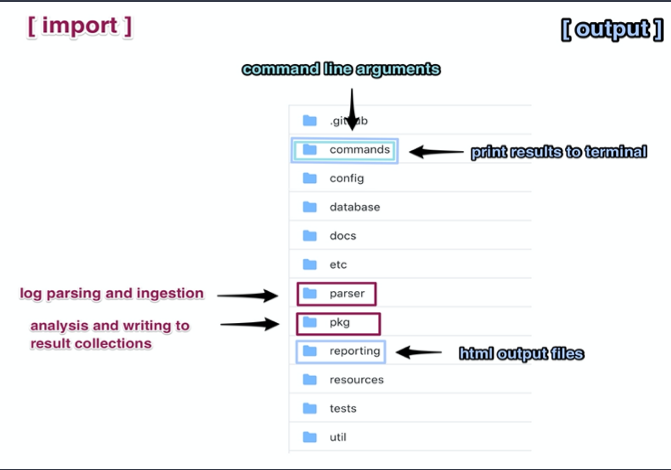
The repository is made up of several folders, each containing their own modules that handle specific tasks. The following image displays the file structure of the repository. The highlighted folders are the folders that you’d most likely touch if you were to add a new feature. The non-highlighted folders contain boilerplate and configuration code that will most likely not need to be changed.
The RITA mongo database structure is comprised of one metadatabase and individual databases with their own datasets. Each individual database is named by the user upon importing logs.
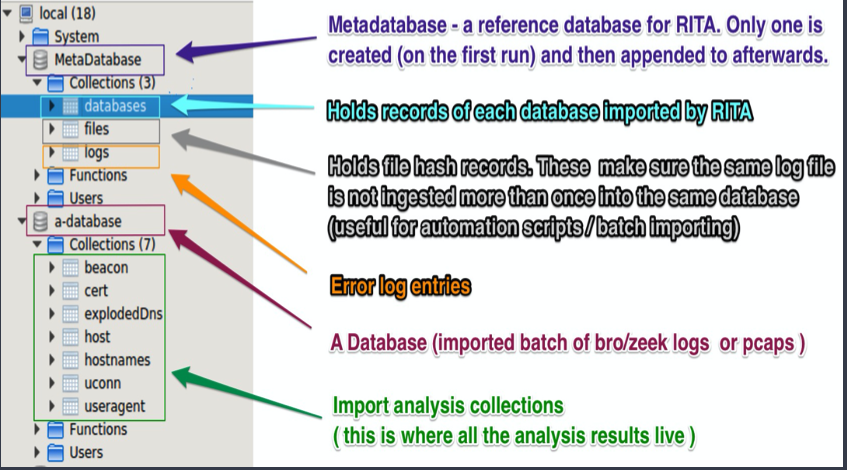
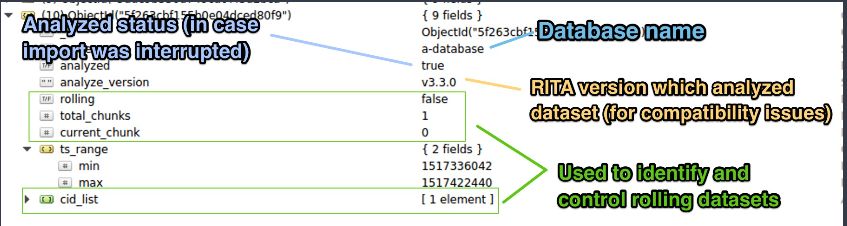
The metadatabase contains a database collection. Within the database collection there is one document per database that contains details about the database that might be useful during debugging failed or broken analysis results.
RITA Dev Setup
Workspace & Tools
OS: Ubuntu 16.04/18.04
Database: MongoDB 3.6
Language: Go 1.12+
DB GUI: Robo 3T
Text Editor: Atom
Atom Packages: go-plus
The recommended operating system for running a development setup is Ubuntu 16.04/18.04. This setup guide will only be referring to instructions for Ubuntu.
The following directions assume you do not already have Go installed and set up. If you already have Go installed, verify you have the correct version, your $GOPATH is set, and your file structure/Go workspace is set up properly.
Installing Go
Update & upgrade to apply security patches:
sudo apt-get update
sudo apt-get -y upgrade
Note: The following link can change in the future as RITA upgrades to new versions of Go, so be sure to verify the version number in the following commands. The current Go version can be verified in the go.mod file located at the root of the GitHub repository.
Download Go:
wget https://dl.google.com/go/go1.14.linux-amd64.tar.gz
sudo tar -xvf go1.14.linux-amd64.tar.gz
sudo mv go /usr/local
Create your Go workspace directory. The directory can be named whatever you like. To make things simple, in this example the directory will be named go.
mkdir -p $HOME/go/{bin,src}
This workspace contains two subdirectories:
src: All of the code and repositories containing go code lives here
bin: Executables that Go compiles live here
Add the Go executable and your new Go workspace and the /bin subdirectory to the PATH environment variable in your ~/.bashrc file:
Note: If you want these environment variables to persist on restart, add them to the bottom of your ~/.profile. Proceed with caution.
export PATH=$PATH:/usr/local/go/bin

export GOPATH=$HOME/go
export PATH=$PATH:$GOPATH/bin
source ~/.bashrc
Installing Mongo
Import the public key used by the package management system:
wget -qO - https://www.mongodb.org/static/pgp/server-3.6.asc | sudo apt-key add -
The operation should respond with an OK.
Note: The following links can change in the future as RITA upgrades to new versions of MongoDB, so be sure to verify the version number in the following commands. We currently recommend using v3.2 – 3.7, though it can be verified in our manual install instructions.
However, if you receive an error indicating that gnupg is not installed, you can install gnupg and its required libraries using the following command:
sudo apt-get install gnupg
wget -qO - https://www.mongodb.org/static/pgp/server-3.6.asc | sudo apt-key add -
Create a list file for MongoDB:
echo "deb [ arch=amd64,arm64 ] https://repo.mongodb.org/apt/ubuntu xenial/mongodb-org/3.6 multiverse" | sudo tee /etc/apt/sources.list.d/mongodb-org-3.6.list
Update local packages:
sudo apt-get update
Install MongoDB:
sudo apt-get install -y mongodb-org
Create data directory for MongoDB:
sudo mkdir -p /data/db
Prevent Mongo from auto-updating (Optional)
echo "mongodb-org hold" | sudo dpkg --set-selections
echo "mongodb-org-server hold" | sudo dpkg --set-selections
echo "mongodb-org-shell hold" | sudo dpkg --set-selections
echo "mongodb-org-mongos hold" | sudo dpkg --set-selections
echo "mongodb-org-tools hold" | sudo dpkg --set-selec
Start the Mongo Daemon:
sudo mongod
Set daemon to start on boot: (Optional, for dev work it may be convenient to easily kill the mongo daemon if something goes wrong)
sudo systemctl enable mongod
A good free & open source Mongo GUI is Robo 3T, which can come in handy when debugging imports and easily viewing & querying what you have stored in your Mongo database.
Cloning RITA
If you do not have direct write permissions to the RITA project, you will need to fork it and clone your forked repository.
Install git:
sudo apt install git
Clone RITA:
Using SSH (requires ssh key for GitHub):
git clone [email protected]:activecm/rita.git
Using HTTPS (use this if you don’t have ssh keys set up with GitHub):
https://github.com/activecm/rita.git
Configure RITA
RITA looks for a config file at /etc/rita. Copy the default config file from the repository over to /etc/rita.
sudo mkdir /etc/rita && sudo chmod 755 /etc/rita
sudo mkdir -p /var/lib/rita/logs && sudo chmod -R 755 /var/lib/rita
sudo cp $GOPATH/src/github.com/activecm/rita/etc/rita.yaml /etc/rita/config.yaml
sudo chmod 666 /etc/rita/config.yaml
Building RITA
cd to the directory where the RITA repository resides. This should be:
~/your-go-workspace-name/src/github.com/activecm/rita
Run:
make
Adding New Commands in RITA
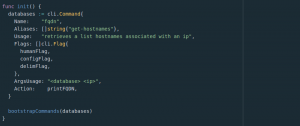
For many of the new features that you may be planning on adding to RITA, there is already something that does something similar. For example, what if we wanted to create a new command that would resolve the hostname for a given IP address and database? Instead of writing the entire command from scratch, you can duplicate one of the existing command files and tweak it to fit your needs for your new command.
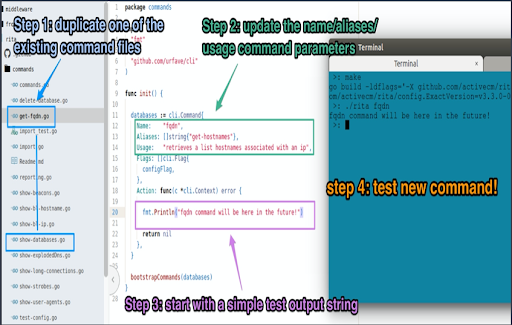
After creating a basic command, we need to add argument usage information and a check to verify that the argument was passed in on the command line.

Running the command followed by -h (ex. ./rita fqdn -h) will show the usage information for the command, allowing you to verify that your usage information is being populated correctly.
We can even specify the action to be a function, as shown below:
There are many show/print functions that can be found in other command files that you can copy & paste and tweak to return the data that you’re looking for. This example will use a tweaked version of the showStrobes function as printFQDN.
For this example and many other commands you may want to add, you will need to write Mongo queries to lookup and fetch data out of MongoDB. We highly recommend using a MongoDB GUI to write & debug your queries so that you can easily see what your query is returning and on what line it may be failing. Once your query is complete and you’re confident in the data it is returning, you will need to convert it into Go syntax. We like to call it “slapping on the bson.”
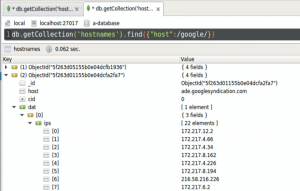
We can grab all records in the hostnames table where the host matches the regex /google/. We can reference these IPs later in order to verify our hostname resolution is working properly.
When fetching and grouping data, we use the aggregate method instead of find. Let’s aggregate the data in the hostnames table to return the hostname for a given IP.
db.getCollection('hostnames').aggregate([
   {"$match":
      {"dat.ips": /172/}, //this can be a regex or a string
   },
   {"$group":
      {"_id": "$host"}, //return only unique hostnames
   },
   {"$limit": 1000}, //limit our results to 1000
])
We can verify that this works by passing in some of the IPs from our other query above and making sure that we get a /google/ hostname in our resolution.
Now, what if we wanted a query that returned a list of hostnames for a given IP? The query for this is a bit more involved, but there are quite a few examples throughout the RITA repo that you can steal code from and tweak to shape your data. Just make sure that you thoroughly test your data by using other data that you know to be true, like referencing IPs or hostnames in your database and verifying that they match.
db.getCollection('hostnames').aggregate([
   {"$match":
      {"dat.ips": /172/},
   },
   {"$limit": 1000},
   {"$group": {
      "_id": "1", //group into a single result
      "hostnames": { //create a property called hostnames
         "$addToSet": "$host" //add each hostname to a unique //set
      },
   }},
   {"$project": { //format output
      "_id": 0, //don’t include the id
      "count": {"$size": "$hostnames"}, //return the # of //hostnames
      "hostnames": {"$slice": ["$hostnames", 20]}, //limit //hostnames to a length of 20 hostnames
      }},
])
Now it’s time to slap a bson on it. The general rule of thumb is:
- Slap on a bson.M in front of every open curly brace
- Slap a []interface{} in front of every open square bracket and the replace the respective opening and closing square brackets with curly braces
- Replace every empty array [ ] with []interface{}{}
- Replace every regex with bson.RegEx{your-regex-val-or-variable, “”}
- Add a comma after every line
We recommend building RITA (run make in the terminal) after every query you add before making any more changes to make it easier to notice if you missed any of these syntax requirements. The compiler will give you the line number where the build failed. Check to make sure that you didn’t forget a comma, a bson.M, or []interface{}’s. Having the go-plus package installed in Atom will also check your code for errors on save which can help you figure out what you may be missing.
The Go syntax for the above query:
fqdnQuery := []bson.M{
   bson.M{"$match":
      bson.M{"dat.ips": "23.201.71.46"},
   },
   bson.M{"$limit": 1000},
      bson.M{"$group": bson.M{
         "_id": "1",
         "hostnames": bson.M{
            "$addToSet": "$host",
         },
   }},
   bson.M{"$project": bson.M{
      "_id": 0,
      "count": bson.M{"$size": "$hostnames"},
      "hostnames": bson.M{"$slice": []interface{}{"$hostnames", 20}},
   }},
}
Going back to our printFQDN function, we can just copy the showStrobes function from show-strobes.go and tweak it. Let’s use our first query for simplicity and throw it into our result function:
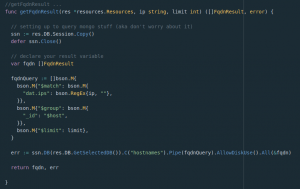
We need a type to store the results in:
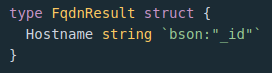
The struct property (Hostname) must start with a capital letter. The bson properties have to match the names of the fields that you’re returning in your mongo query. Since the hostname in this example is the _id field, we reference _id.
After this, it’s just a matter of updating the rest of the functions to return our fqdn data. Here is a comparison of get-fqdn.go (left) and show-strobes.go (right).
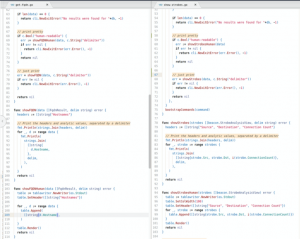
The majority of the code stays the same across commands aside from the mongo queries and data types that store the results.
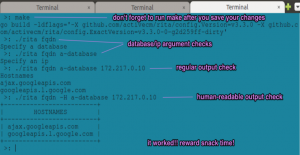
Testing Your New Command
Testing is always an important step in adding any new feature. Let’s go ahead and test our new fqdn command to verify that it’s working as expected.
Adding new features to RITA may seem like an insurmountable task at first glance, but it really is just a matter of copying existing code and tweaking it to fit your needs. This is especially true for adding commands and modifying output, including HTML reports.
Contribution Rules & Suggestions
Be sure to read our contribution rules before submitting issues or pull requests.
If you’d like to learn more about Contributing to RITA, check out this past webcast.
Community
Have you joined our threat hunter community yet? We have many channels related to threat hunting but also dedicated development channels that are actively seen by our dev team. We would be happy to help you achieve your feature goal or start a pull request for a new feature into the main RITA repository.
Under the Development section, we have:
#rita-development for all RITA dev questions and discussion
#go-development for all Golang questions & discussion
As mentioned earlier, you don’t have to learn Go to get started, and if you have any questions/issues with Go feel free to drop them in the #go-development channel!

Naomi Kramer is a senior at Dakota State University majoring in Computer Science.
She has been working in software development for three years and specializes in modern full-stack web development.
Her interests include oil painting, graphic design, Swedish ciders, paddleboarding, and adventuring with her two Siberian Huskies.