Threat Simulation – DNS
Intro
This article is number 4 of 8 in a series on testing Threat Hunting software to make sure that it’s configured correctly and working successfully. If you’ve not already read the “Threat Simulation Overview and Setup” article, start there and return here to test whether your Threat hunting platform can detect malware communicating over DNS.
What Traffic Are We Trying to Find?
An infected system on your network has multiple options for communicating with a Command and Control (C2) server. In addition to opening a fresh connection every few seconds and asking whether there’s work to be done (beacon traffic), or leaving a connection to the C2 server open continuously (long connections), it can also use DNS traffic to communicate with the server.
The advantage of this approach is that networks almost universally need to allow outbound DNS requests in some way, so it’s rarely practical to block DNS traffic. This means that one needs to detect when DNS is being abused for C&C communication. In this article, we’ll simulate an infected machine communicating with a C&C server to see if the Threat Hunting software can detect this pattern.
What Tools Are Needed
On the Internal system, we’ll be using “dig” running inside “screen” to generate regular DNS requests.
On the external system, we’ll have a DNS server configured to reply for an otherwise-unused domain. During this testing it is possible that an existing DNS monitoring system could also notice this traffic pattern and place the domain on a blacklist, so please don’t use an existing domain for this test.
What to Set up on the External System
You have multiple options for how to serve this domain:
- Serve this new domain on your External server. While the specific steps differ based on the operating system you’re using, here’s the overview:
– Pick a new domain to serve.
– Install a DNS server. “bind”, possibly called “bind9” in your package list, is included with most Linux distributions. The instructions you use will need, at a minimum, to walk you through setting up “/etc/named.conf” to serve the new domain and creating a text file that holds the answers to return for objects in your domain.
– Configure your nameserver to respond with empty answers for all requests in this domain.
– Register the new domain and give the IP addresses of the External server as the nameservers for it. - Serve this domain on an existing DNS hosting service.
– Pick a new domain to serve.
– Configure your DNS hosting service to respond with empty answers for all requests in this domain.
– Register the new domain and give the IP addresses of the DNS hosting service as the nameservers for it. - Use “example.com” as the fake domain and direct the requests to the external server.*
– Install a DNS server such as bind.
– Configure your nameserver to respond with empty answers for all requests in “example.com”.
*Note that in this case, we don’t have to register “example.com” with a domain registrar – we couldn’t even if we wanted to. “example.com” is explicitly reserved for internal use and testing so we can use it for any purpose we want.
What to Set up on the Internal System
Here we’ll be placing DNS requests to look up random objects in our test domain. Replace “example.com” below with your test domain, and replace Ext4 and Ext6 with the IP addresses of the server responding for this DNS domain.
screen -S testdns -R
You’ll be given back a new command prompt running inside screen (so you can disconnect from it and reconnect to it at any time). In this new prompt, run:
while sleep 4 ; do dig +short +time=1 +tries=1 @Ext4
"${RANDOM}${RANDOM}.example.com" A ; dig +short +time=1 +tries=1 @Ext6
"${RANDOM}${RANDOM}.example.com" A ; done
Once you’ve run these, you can press “Ctrl-A”, then “d” to disconnect from the screen session and let those commands run in the background. You can reconnect at any point with
screen -S testdns -R
and disconnect again with “Ctrl-A”, then “d”.
What You Should See on the Threat Hunting Platform
Within an hour you should have around a thousand IPv4 DNS requests and around a thousand IPv6 requests sent. That should be enough to register as overly heavy use of DNS, and all within a single domain.
Because the requests are happening every 4 seconds, these should also show up as beacons.
How to Troubleshoot It If You Don’t
With tcpdump
If you are not seeing this traffic reported as odd DNS traffic, check that the conversation is successfully being started on the Internal server (substitute the name of the Internal system’s ethernet port for eth0):
sudo tcpdump -i eth0 -qtnp '(host Ext4 or host Ext6) and port 53'
and if it is, run the same command on the External server (substitute the name of the External system’s ethernet port for eth0):
sudo tcpdump -i eth0 -qtnp '(host Ext4 or host Ext6) and port 53'
You should see at least one IPv4 and one IPv6 conversation on that port between the two pairs of IP addresses for those systems. If you don’t, see if there’s a firewall that’s blocking this traffic.
If you have command-line access to the Threat hunting system, run the same command there, changing “eth0” to the name of the interface that’s capturing traffic:
sudo tcpdump -i eth0 -qtnp '(host Ext4 or host Ext6) and port 53'
If you’re using a DNS hosting service instead of running a DNS server on your own system, substitute this command for the commands above:
sudo tcpdump -i eth0 -qtnp '(host dns1 or host dns2 or host dns3) and port 53'
Where dns1, dns2, dns3, etc. are the ipv4 and ipv6 addresses that respond to queries for your custom domain.
If the traffic shows up on the Internal and External systems, but not when you run the sniffer command on the Threat hunting system, recheck that the Threat Hunting system is plugged into a span/mirror/copy port on a switch that sees the traffic from Internal to External.
With Zeek
We can pull out the queries and the requestor IP addresses from Zeek’s DNS log:
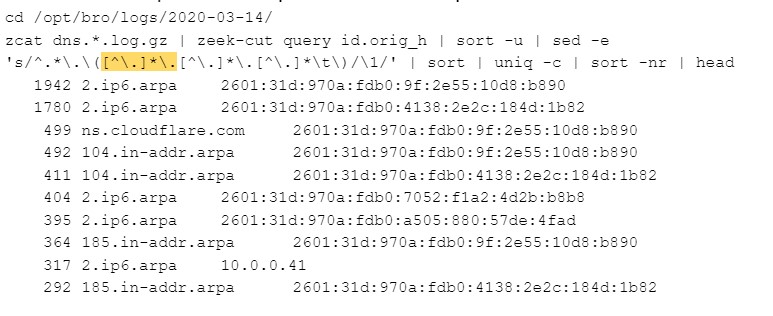
Here’s what that command does:
- Get all DNS…log lines (automatically uncompressing them with cat)
- Pull out just the DNS object requested and the IP address making the request
- Sort and Uniq them so we only count a given DNS object from a particular IP once.
- Throw away all the leading stuff in the DNS request, leaving only the last 3 DNS atoms. This turns “2.8.b.1.d.4.8.1.c.2.e.2.8.3.1.4.0.b.d.f.1.0.7.2.b.8.7.0.1.0.5.2.ip6.arpa” into “2.ip6.arpa”, grouping similar requests together. I’ve highlighted the portion of that command that matches exactly one atom (like “ip6”). If you want to look at the last 2 atoms instead of three, delete the highlighted text above. If you want to see what shows up when you look at the last 4 atoms instead of 3, duplicate the highlighted block, adding the new one between “\(” and “[^\.]*\.”
- Sort so similar objects are close to each other, count how many times they show up, make the most common entries show up at the top of the list, and only show the top 10.
Ways to Obfuscate the Traffic
Because the requests are always 4 seconds apart, this is a clear clue to threat hunting packages that this is a beacon. To obscure that, replace “sleep 4” with:
sleep $[ $RANDOM / 4096 ]
Which will sleep for a random number of seconds between 0 and 8. This won’t totally hide the beacon behavior, but will make it a little harder to classify.
To change the request size, you can consider the ${RANDOM}.${RANDOM} in “${RANDOM}${RANDOM}.example.com“. As it stands it’s already a slightly random length – potentially as short as 2 characters and as long as 10 (each $RANDOM returns a number from 0 to 32767). You could replace this with up to:
"${RANDOM}${RANDOM}${RANDOM}${RANDOM}${RANDOM}${RANDOM}${RANDOM}${RANDOM}${RANDOM}${RANDOM}${RANDOM}${RANDOM}.example.com"
Note that an individual atom has a maximum size of 63 characters, so you can’t go beyond 12 “${RANDOM}’s.
The dig commands above are all “A” lookups (turning a hostname into an IPv4 address). Try replacing “A” with “TXT” to change the requests to TXT lookups; see if your Threat Hunting platform can still identify them
Extra Credit: DNScat
The above commands certainly do send A (or optionally, TXT) records, but they’re random names. To see if your Threat Hunting platform can detect a tool that can actually tunnel traffic over DNS, take a look at DNScat.
DNScat consists of a client and server that need to be separately installed in your Internal and External servers, respectively. The above web page has instructions on how to configure them in multiple ways.
Once it’s installed, you can send arbitrary content from one machine to another. Anything fed to the standard input of the client comes out of standard output on the server, and anything fed to standard input on the server comes out of the standard output on the client. All of this content is converted to DNS records in between the client and server.
One thing to note is that DNScat uses CNAME records instead of the A and TXT we’ve mentioned so far. This gives you one more record type to test how flexible your Threat Hunting software is in detecting DNS tunneling.
Links to All Posts in “Threat Simulation” Series
- Unexpected Protocol on Non-Standard Port
- Long Connections
- Client Signatures (User Agent)
- DNS
- Beacons
- Threat Intel
- Certificate Issues
- Client Signatures (TLS Signature)

Bill has authored numerous articles and tools for client use. He also serves as a content author and faculty member at the SANS Institute, teaching the Linux System Administration, Perimeter Protection, Securing Linux and Unix, and Intrusion Detection tracks. Bill’s background is in network and operating system security; he was the chief architect of one commercial and two open source firewalls and is an active contributor to multiple projects in the Linux development effort. Bill’s articles and tools can be found in online journals and at http://www.stearns.org.