How to Change the IP Addresses in a PCAP File

This has come up a few times in the last couple of weeks, so I thought I would create a blog entry describing the process. You have a pcap file you wish to share, but you don’t want to reveal some of the IP address information that is stored within the file. A bit of Googling may make you feel like you need to be a Scapy guru to accomplish the task. In this blog I’ll give you two methods for solving this problem. The first simply removes the questionable packets. The second rewrites the IP address info within the PCAP file.
Removing IP Traffic To/From Specific Systems
If the IP address info you wish to hide does not need to be in the pcap file you will be sharing, you can simply remove the packets. You can do this with any packet capture tool that can read and write pcap files. You also want to be sure you can filter the traffic to remove the unwanted endpoints.
Removing Traffic With tcpdump
With tcpdump, we can read in the original pcap file (-r), filter the traffic through one or more BP filters, and then write the traffic out to a new file (-w).
For example, imagine I want to read in the PCAP file “in.pcap”, filter out all of the traffic associated with the network 192.168.200.0/24, and then write the traffic out to a new PCAP file named “out.pcap”. The syntax would be:
tcpdump -nn -r in.pcap -w out.pcap not net 192.168.200.0/24
The new file would include all of the original packets except for the ones going to or from the 192.168.200.0 network. If I simply want to filter out a single system, I could use “host” instead of “net” and list the specific IP address rather than a network range. If I have multiple systems or networks I need to filter, I could:
- Modify the CIDR mask
- Combine multiple statements using “and” (not host 192.168.1.1 and not host 192.168.1.53 and not net 192.168.20.0/24)
- Run tcpdump against “out.pcap” to perform additional filtering, writing the changes out to “out2.pcap”. Repeat as needed.
Removing Traffic With tshark
You can remove IPs and subnet ranges with tshark as well, although the syntax is a bit more challenging. You have to ensure that you create your display filter as a logical “or” as opposed to an “and” or your filter will only match when both the source and destination addresses match the filter. Here’s a proper example:
tshark -n -r in.pcap -w out.pcap not '(ip.addr==192.168.200.0/24)'
Removing Traffic Caveats
There are some limitations to this method. All ARP packets will still contain the original IP address info unless you filter those out as well. If your original IP address info is recorded in the application layer of cleartext protocols such as DNS, HTTP, and others, the above method does not remove that info.
Checking the Results With ngrep
If you want to check payloads for the addresses you are trying to hide, you can use ngrep to verify the results. For example:
ngrep -q -I out.pcap '10\.55\.200\.'
Will check the payload of all packets for the IP address string “10.55.200.” Note that it’s possible you may see some false positives, but if this search turns up no results you should be good to go.
Changing the IP Address Info in the PCAP File
Most likely, you will want to change the IP address information that’s stored with the file. This can be done quickly and easily using tcprewrite. This tool is included as part of the “tcpreplay” package. To install this on Ubuntu you simply run:
sudo apt -y install tcpreplay
You can then check the install:
$ which tcprewrite
/usr/bin/tcprewrite
Let’s look at an example. Imagine I have the PCAP file “mypackets.pcap”. Using tshark with the “-T fields” parameter, I display the address info in the file.

Note the blank address info in line 2 is not IP traffic. This is most likely ARP traffic. Now, let’s assume that I want to obfuscate all traffic going to and from “10.55.0.0/16”, and want to change it to be “192.168.0.0/16”. I could do this using the tcprewrite command:
tcprewrite --pnat=10.55.0.0/16:192.168.0.0/16 --outfile=mypackets-clean.pcap --infile=mypackets.pcap
Here’s an example:
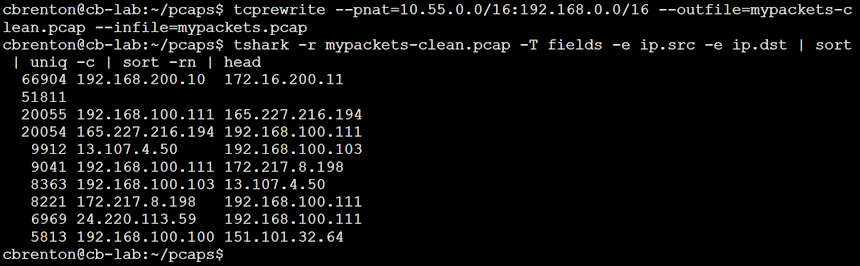
When I ran the tcprewrite command it simply returned to the command line. This is an indication that there were no errors. I then reran my tshark command to check the source and IP addresses being used. Note that tcprewrite changed the first two bytes of each IP address as I had specified, but the last two bytes remain unchanged. This ensures that none of the session data becomes broken.
Randomizing the IP Address Info
If you wish to obfuscate the data even further, you can use the “–seed-number” parameter instead of “–pnat”. This takes a numeric value that you specify to randomize all IP addresses. Note that this changes all of the IP addresses, not just a specified range. However tcprewrite will consistently change each IP address so that session data does not get broken.
tcprewrite Caveats
Unlike the first option, tcprewrite will modify ARP packets to match the IP address changes you have requested. However, like the first option it does not change application data. So it’s possible that the original IP info could be revealed within one or more cleartext protocols that store this type of data within the payload.
Checking the Results With ngrep
Just like the first option, you can use ngrep to see if any of the original IP address info appears in the payload of any of your packets. We could check the results of tcprewrite using the command:
ngrep -q -I mypackets-clean.pcap '10\.55\.'
If no packets are returned, we can share the file “mypackets-clean.pcap” with other folks knowing that the IP address info has been obfuscated.

Chris has been a leader in the IT and security industry for over 20 years. He’s a published author of multiple security books and the primary author of the Cloud Security Alliance’s online training material. As a Fellow Instructor, Chris developed and delivered multiple courses for the SANS Institute. As an alumni of Y-Combinator, Chris has assisted multiple startups, helping them to improve their product security through continuous development and identifying their product market fit.