Yubikeys – Introduction
Intro
This the first in a multipart blog series on the Yubikey, a second-factor authentication device that is:
- Inexpensive
- All but indestructible
- USB-powered, so no battery
- OS and language independent
- Supported by a wide range of applications and web services
This post is designed to give you the basic concepts needed to use it; the other posts will all focus on how to use the Yubikey with a specific application or service.
What Is It?
The Yubikey hardware is very simple: they generally include a USB connector for attaching to a computer or phone, and have a button. When you need to log in to something, put the Yubikey in a USB port and press the button.
While there are other aspects to this device, that’s about 90% of what you need to know. 🙂
Why?
We have lots of authentication options available to us – why would one choose the Yubikey over another type of authentication?
- Unlike a file stored on a system somewhere, Yubikeys store the needed credentials away from the drive of a potentially compromised system. While individual one-time passwords can be sent to a computer, the underlying details needed to generate these can’t be extracted from the Yubikey.
- The key can’t be duplicated or copied to another blank yubikey.
- A single yubikey can provide first or second factors for any number of OS logins, applications, and browser-based applications. These can be added one at a time as needed.
- They’re relatively inexpensive; a single Yubikey can range from $45 to $85 (US dollars at the time of this writing). This allows one to buy two – one to keep on a keyring all the time, and another to place in a secure location in case the keyring is lost.

(Many thanks to Randall Munroe for the years of geeky laughs at https://xkcd.com .)
Options
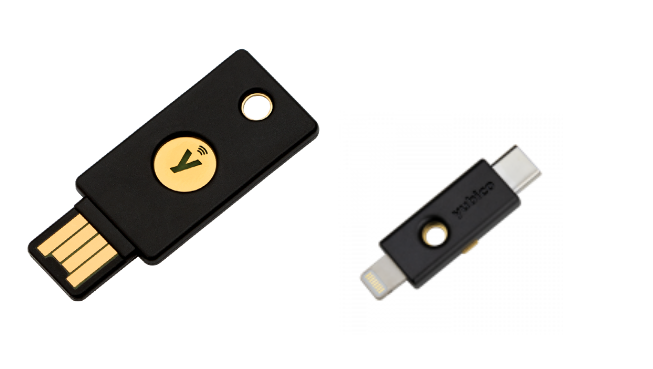
Yubico has a range of Yubikeys available for different needs:
- There are two basic categories: Yubikey 5 (FIPS and non-FIPS) which has the widest range of authentication tools, and FIDO keys (Yubikey Bio and Security Key) which are more limited, but less expensive. FIDO is better if you primarily want OS and web authentication; Yubikey 5 is better if you have advanced needs like the ability to store SSH keys or authenticate to a phone with NFC.
- USB-A, USB-C, and/or Lightning connectors¹, and NFC support for some phones
- Optional FIPS certification (Yubikey 5 FIPS)
- Optional fingerprint reader (Yubikey Bio)
- Regular size or Nano (designed to fit almost entirely inside the USB port)
This article series is focused on the Yubkeys used to log in to remote services. We won’t cover the YubiHSM 2 line which stores secrets for use by a server.
See https://www.yubico.com/products/ for a list, and walk through https://www.yubico.com/quiz/ if you’d like help deciding which to use. Most of the models can be ordered from Amazon as well ( https://www.amazon.com/s?k=Yubikey ).
We strongly recommend you buy 2 of these; one will stay on your keyring and the other should be placed in a secure location. When you set up a new application, you’ll register both yubikeys so if one is lost you can immediately switch to the other.
How Do We Set It Up?
Once you have keys in hand you need to take a look at each program you use that needs some kind of login. Yubikeys can provide either the primary login or a second factor for lots of operating systems, web browsers, and applications.
To tell if a Yubikey can be used to provide a login to a particular application, enter the name of the application in the search box on https://support.yubico.com/hc/en-us. Many of the resulting pages give a table indicating which Yubikeys can be used and which are incompatible:
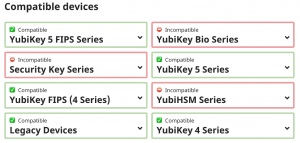
(Note that this article was being written right around the time the Yubikey Bio was released, so the entries for the Bio might not be current.)
Yubico provides good documentation on how to configure a particular application to use a Yubikey for authentication. Depending on the program this might include going to a “Settings” or “Authentication” menu or editing one or more text files, then plugging in and pressing the button on the Yubikey(s) you have.
One nice thing about the Yubikeys is that you can set them up one application at a time – you don’t need to shut everything down for a weekend and get everything switched over at once, you can just add new applications as time allows.
The remaining posts in this series will cover using the Yubikeys with common applications. If we’ve not covered your favorite tools, check back with Yubico’s support site (https://support.yubico.com/hc/en-us) and search for the program name.
References
https://en.wikipedia.org/wiki/YubiKey
¹If you need a single Yubikey to work with multiple USB or lightning port types, you can get a converter that allows a Yubikey with a given connector to work with other connectors. Example: This converter allows a USB-A Yubikey to work with USB-C, Lightning, and Micro-USB: https://www.aliexpress.com/item/32932240693.html
Yubikey Series
Part 1: Yubikeys – Introduction
Part 2: Adding a Second Factor to Any Network Service

Bill has authored numerous articles and tools for client use. He also serves as a content author and faculty member at the SANS Institute, teaching the Linux System Administration, Perimeter Protection, Securing Linux and Unix, and Intrusion Detection tracks. Bill’s background is in network and operating system security; he was the chief architect of one commercial and two open source firewalls and is an active contributor to multiple projects in the Linux development effort. Bill’s articles and tools can be found in online journals and at http://www.stearns.org.